Calling All Royalty! Paper Crown Activity
Calling all Princes, Princesses, Queens and Kings: Alice wants you to celebrate your royalty! Cut, fold and decorate to create a paper crown of gold, silver and bronze value. Wear your crown creation proudly or share its majesty with a friend or family member you cherish.
Shape & Sorts Paper Crown
What You’ll Need
-
- Paper
- Ruler
- Glue
- Scissors
- Crayons, colored pencils or markers
What You’ll Do
-
- Cut two 2 x 12 inch strips of paper. Glue together to create a 2 x 24 inch strip of paper.
- Wrap the 2 x 24 inch strip around the wearer’s head to determine the size for the headband. Make a mark to note the appropriate length then cut the strip to allow for just the right fit. Lay the newly sized paper headband flat on the art-making surface.
- Cut out a variety of shapes to add height to the crown. Will your crown have triangle points, circular curves or square structures? How can you use different shape sizes and colors to make a unique crown design?
- Glue your shapes to the back of the paper headband.
- Add designs to the crown on the front side of the paper headband. Glue additional paper shapes or use a favorite drawing utensil to decorate the crown with interesting details. How can you use shape and color to make a pattern for the crown?
- When the decorations are complete, glue the headband ends together to create a crown that fits right on top of a regal head!
Origami Fold Paper Crown
What You’ll Need
-
- 6 x 6 Paper
- Ruler
- Scissors
- Crayons, colored pencils or markers
What You’ll Do
-
- Cut six to eight 6 x 6 inch paper squares. The number of squares used will be determined by the head size of the wearer.
- Fold one 6 x 6 inch square in half widthwise. Crease the edge to mark the fold then unfold back to a flat sheet of paper.
- Fold the 6×6 inch square in half again lengthwise. Crease the edge to mark the fold then unfold back to a flat sheet of paper to reveal that the paper has been folded into fourths.
- Fold the top right corner to the center fold of the paper and crease the edge. Repeat the fold with the top left corner.
- Fold the lower half of the paper up so that the paper edge meets the crease line in the center of the paper.
- Fold the lower half of the paper up again so that the middle crease becomes the paper edge.
- Repeat steps 2 through 6 with the remaining 6 x 6 paper squares.
- Connect the folded papers together to assemble the crown.
- Start by slipping the corner of one folded paper into the rectangle fold on the other piece of folded paper. Slide until the corner meets the center fold of the other piece of folded paper.
- Continue sliding corners of folded pieces together until all folded papers are joined.
- Use your favorite drawing utensil to decorate the crown with a royal design.
- Join the end pieces together to form a crown that fits right on top of a regal head!
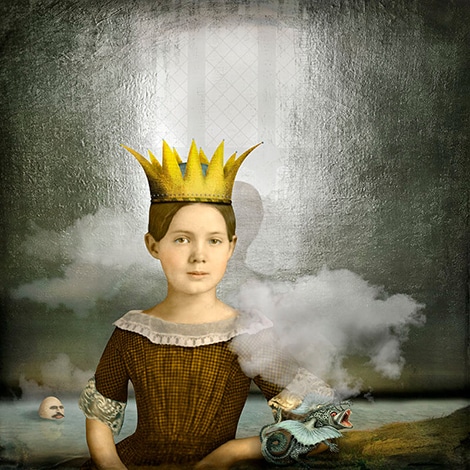
Image: Maggie Taylor, And what Alice found there., 2017, pigment inkjet print, courtesy of the artist